picture-shuffle
posted: September 18, 2010 at 06:00 PM categories: css3, yui, canvas, animation, html5 view comments
Download Video: WebM | MP4 | OGG
Running the demo
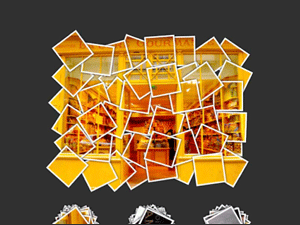
Click the 'start svg demo' button on this page. When the page is loaded, you can click on one of the picture stacks at the bottom. The stack will be dispatched to form a full picture. You can click anywhere on the image to fold it back into a stack.
Creating a polaroid collage from picture cut-outs
The idea for this demo came from my son Romain who came back from an Adobe Photoshop course he was taking. Romain showed me a polaroid collage effect he had created. The effect was quite nice, similar to some you can find on the web if you look for Photoshop polaroid effect. Of course, being an SVG geek, I thought about how this could be done in SVG, and I started hacking away a few days before the SVG Open 2010 conference where this demo was first shown.
I also decided that I wanted the demo to go a little beyond what people do in photoshop, where the content of the Polaroid collage is perfectly aligned, which helps readability but is a bit unrealistic. I wanted the individual images to be slightly missaligned, as they would be if you had a real stack of Polaroids that you were assembling into a collage.
From idea to implementation
For this to be easier than in Photoshop, the demo had to let the code just point to an image and then automatically slice it up in individual Polaroids that would be assembled into the collage.
I first used a full SVG solution, using the
<pattern> element. It did the job
functionally. Unfortunately, most implementations (except Safari),
could not handle the number of <pattern> elements
that had to be created. The performance problem got worse when a
drop shadow effect got added to the individual Polaroids and in some
cases (i.e., browsers which do not support SVG filter effects), the
drop shadow was simply not an option.
So, I had to turn to something else.
Canvas to the rescue
The solution that I ended up implementing uses a mix of SVG and Canvas, and I think it is a great example of how the two technologies complement each other.
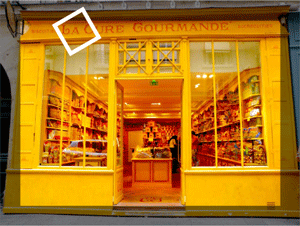
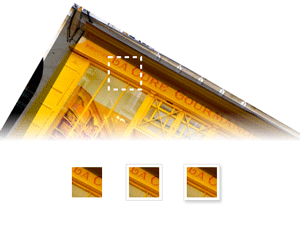
Canvas is used to create the Polaroids and render the right content from the original picture, border and drop shadow as illustrated bellow.

Figure 1: desired result |

Figure 2: one Polaroid |

Figure 3: offscreen rendering: content, border and drop shadow. |
// Canvas where the image to slice up is rendered once.
var imgCanvas = ...;

// Canvas an context where each Polaroid 'snapshot' is drawn.
var snapshotCanvas = ...,
    snapshotContext = snapshotCanvas.getContext('2d');

/**
 * Renders a snapshot of the image with the polaroidSize and centered on
 * (cx, cy) with a rotation of r degrees. Some random noise is added to these
 * values to create a more realistic rendering.
 *
 * @param cx the exact image center on the x-axis
 * @param cy the exact image center on the y-axis
 * @param r the exact rotation, for a perfect picture alignment
 */
function snapshot (cx, cy, r) {
    var p = 0.01; // alignmentRoughness
    var ar = (1 - p + 2 * p * Math.random()) * r,
        acx = (1 - p + 2 * p * Math.random()) * cx,
        acy = (1 - p + 2 * p * Math.random()) * cy;

    snapshotCtx.save();
    snapshotCtx.clearRect(0, 0, polaroidSize.width, polaroidSize.height);
    snapshotCtx.translate(polaroidSize.width / 2, polaroidSize.height /2);
    snapshotCtx.rotate(-ar * Math.PI / 180);
    snapshotCtx.translate(-acx, -acy);
    snapshotCtx.drawImage(imgCanvas, 0, 0);
    snapshotCtx.restore();
}

// Use further code to render the border and drop shadow.
Once each
Polaroid is created, it is transfered to an SVG <image>
element like so:
var canvas = ..;

// Draw content, border and drop shadow into canvas
// ...

// Convert canvas content to a dataURL
var dataURL = canvas.toDataURL();

// Set the dataURL on an SVG <image>
var image = document.createElement(svgNS, 'image');
image.setAttributeNS(xlinkNS, 'href', dataURL);
Animating with YUI SVG Extensions
Like for many other demos on this web site, the animations are created
with YUI
SVG Extensions. There is an animation of the transform
attribute for each
<image> element.
The same animation is used both to dispatch the image from
the stack to its position and to fold it back into the stack. This
is done by using the
reverse animation property.
// Reverses the animation when it ends: change its 'direction' and
// also adjust its duration, depending on whether it is dispatching
// or folding back. The duration is in the [0.15, 0.30] seconds range
// for folding back and in the [0.25, 0.5] for dispatching.
function getReverseHandler (a) {
    return function () {
        a.set('reverse', !a.get('reverse'));

        if (a.get('reverse') === true) {
            a.set('duration', 0.15 + 0.15 * Math.random());
        } else {
            a.set('duration', 0.25 + 0.25 * Math.random());
        }
    };
}

// Iterate over all the images created from the canvas dataURLs
while (image !== null) {
    // ...
    anim = new sw.animation.Animate({
        node: image,
        from: {
            transform: {
                r: c.r + 90,
                tx: stackPosition.x + 10 - 20 * Math.random(),
                ty: stackPosition.y + 10 - 10 * Math.random()
            }
        },
        to: {
            transform: {r: c.r, tx: c.cx, ty: c.cy}
        },
        transformTemplate: "translate(#tx, #ty) rotate(#r) " +
                           "translate(" + (-c.cx) + "," + (-c.cy) + ")",
        duration: 0.25 + 0.25 * Math.random(),
        easing: Y.Easing.easeOutStrong
    });
    // ..
    anim.onEnd(getReverseHandler(anim));
    // ...
}
Note how the end handler also changes the animation's duration, so that folding back the pictures is faster than dispatching them. There is also some randomness used on the animation duration to give the effect a more realistic feel.
SVG and Canvas: Great complements
This demo showed how SVG and Canvas can be both used advantageously:
Canvas is used to slice images and create pre-rendered Polaroids with
their border and drop shadows while SVG is used to easily manage
interactivity and animation on individual <image>
elements. It is great that we have a way to move pixel data from
Canvas to SVG with the dataURL. It would be even better if there
was an API to directly move pixel data between Canvas and SVG without
having to go through
Base64 encoding which is wasteful in memory and
performance.
Small use of <foreignObject>
The instructions on the demo area are displayed by embeding HTML
content inside a <foreignObject> element.